


Imported Cutting Machine (Poultry)
| Weight |
40000 g |
|---|---|
| Item Type |
Chicken/meat cutter |
| Suitable For |
Poultry processing |
| Item Condition |
Imported |
| Features |
Stainless steel |
| Packaging |
Wooden boxes |
| Power control |
Powered by electricity/high capacity generators |
| Estimated delivery (working days) |
Within 7 days |
| Class |
Poultry equipment |
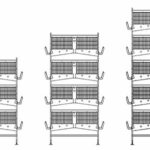
Poultry Processing Line
| Weight |
196000 g |
|---|---|
| Class |
Poultry equipment |
| Estimated delivery (working days) |
Within 7 days |
| Payment Term |
Full Payment |
| Item Condition |
Durable and sturdy |
Livestock Teeth Clipper (Manual Teeth Nipper for Piglets)
| Weight |
500 g |
|---|---|
| Dimensions |
17.78 × 6.3 × 2 cm |
| Class |
Handheld Teeth Clipper |
| Features |
Portable | Stainless steel | Sturdy and durable |
| Item Condition |
Imported , New , portable and safe |
| Suitable For |
Veterinary farm operations | Teeth Clipping |
Precision Seed and Fertilizer Planter
| Weight |
22000 g |
|---|---|
| Suitable For |
Simultaneous planting of seeds and application of fertilizer |
| Item Condition |
New , portable and safe |
| Presentation |
Packaged in paper boxes |
| Country of Origin |
China |
| Estimated delivery (working days) |
3 to 7 days |
Livestock Tag Applicator.
| Weight |
1500 g |
|---|---|
| Item Condition |
New |
| Minimum Order |
1 |
| Estimated delivery (working days) |
Within 7 days |
| Suitable For |
For applying or inserting ear tags on livestock animals |
| Payment Term |
Full Payment |
| Size |
Giant , Medium |
Imported Meat Cutter (Electric Powered | For Chicken Dressing)
| Weight |
40000 g |
|---|---|
| Item Condition |
Imported , New |
| Power control |
Powered by electricity/high capacity generators |
| Estimated delivery (working days) |
3 to 7 days |


Standardized Weights (For Balance Scales | Various Calibrations | Lock Type)
₦20,000.00 – ₦72,965.00

African Giant Snails and Snail Farming (Volumes 1 and 2)
₦3,600.00 – ₦5,400.00
Aquafeed Production, Economics; Health Impact on Fish Management (2020 Edition)
₦4,200.00 – ₦5,400.00
Yosher-Dan Shea Butter (Organic | Natural)
₦6,500.00 – ₦60,000.00
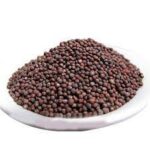
Dwarf Tenera Oil Palm Sprouted Seeds (Pack of 500)
| Weight |
1000 g |
|---|---|
| Payment Term |
Full Payment |
| Item Type |
Seed |
| Item Condition |
Healthy and disease-free |
| Estimated delivery (working days) |
Within 7 days |
| Features |
Comes in different diameters and lengths |


Supergene seedling (Malaysian Dwarf Oilpalm)
| Weight |
3000 g |
|---|---|
| Payment Term |
Full Payment |
| Estimated delivery (working days) |
Within 7 days |
| Item Type |
Seedling |
| Item Condition |
Healthy and disease-free |
| Features |
Comes in different diameters and lengths |
Sunphosate 360SL (Glyphosate Herbicide | 1L)
| Weight |
1000 g |
|---|---|
| Class |
Agrochemicals |
| Packaging |
1 Carton (12 Pieces) , 1 liter bottle |
| Suitable For |
Control of weeds and grasses |
| Estimated delivery (working days) |
Within 7 days |


